TL;DR
Effective closet-based recording starts with understanding that absorption isn’t enough. Smart placement, sealing leaks, and proper ventilation turn a small space into a usable vocal booth. Distance and thoughtful treatment beat expensive foam every time.
Ever tried recording vocals or streaming audio in a tiny closet? It can sound surprisingly decent — or a complete echo chamber. The biggest secret isn’t in fancy foam or expensive gear. It’s about where you put your treatment, what you trap, and how you manage noise leaks. The biggest secret isn’t in fancy foam or expensive gear. It’s about where you put your treatment, what you trap, and how you manage noise leaks.
This guide breaks down practical ways to turn your cramped closet into a quiet, mic-friendly space. For more detailed tips, check out home organization and interior design tips. Whether you want better vocals or just less echo, understanding the real science behind acoustic dampening and placement will save you money and frustration.
Acoustic dampening
& the rig in the closet.
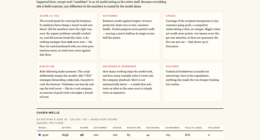
The most powerful noise fix isn’t a material — it’s a floor plan. A rig you can’t hear because it’s in another room beats any amount of foam. Tap the approaches in Part 1 to see what actually works.
(another room)
(levers 1–4)
(door / barrier)
(acoustic foam)
Contain the noise, not the heat
Key Takeaways
- Distance is king — moving your rig to another room often beats any foam treatment. If you want to learn more about optimizing your space, visit home improvement and indoor air quality solutions.
- Placement of absorptive panels at reflection points dramatically improves sound quality.
- Sealing gaps around doors and outlets is essential for reducing noise leaks. You can find helpful advice on sealing and acoustic treatment at acoustic dampening and placement.
- Treat corners with bass traps to prevent low-frequency build-up.
- Ventilation is critical — don’t trap heat in a closet or your rig will throttle and noise will escalate.

Focusound 52 Pack Acoustic Foam Panels 1" x 12" x 12" Sound Proof Foam Panles Soundproofing Noise Cancelling Wedge Panels for Home Office Recoding Studio with 300PCS Double-Side Adhesive
- Soundproofing Design: Triangular grooves for noise absorption
- Includes Adhesive Tape: 300pcs double-sided adhesive for easy installation
- Easy Shape Recovery: Soak in water to restore shape within 48 hours
As an affiliate, we earn on qualifying purchases.
As an affiliate, we earn on qualifying purchases.
Why Most People Waste Money on Foam That Doesn’t Work
Acoustic foam is the shiny object everyone buys first, but it’s often the last thing that actually makes your space better. Foam absorbs sound reflections inside a room, but it does little to block outside noise or prevent your sound from bouncing around.
Think of foam as softening the echo inside a small box — not stopping the box’s walls from transmitting sound. If your goal is to stop noise from leaking out or coming in, you need barriers and sealing, not just absorption.
Over-relying on foam can give a false sense of security. It might improve the internal sound slightly, but without addressing leaks or low-frequency issues, your space remains compromised. The tradeoff is that foam can also muffle your recordings or reduce clarity if placed improperly. Therefore, understanding when and where to use foam—and combining it with sealing and placement—is essential for real improvement.
The Power of Placement: Where to Put Absorbers for Best Results
Placement is everything. The key to a good closet recording space is positioning your treatment where it works the hardest.
For instance, put absorptive panels directly behind your microphone — that’s your primary reflection point. Cover side walls where sound bounces back, and add some overhead to tame flutter echoes.
Imagine standing with a microphone in the middle of a small room. The wall directly behind you and the one opposite are your main reflection zones. Cover those first.
Proper placement ensures that the sound waves bounce less unpredictably, resulting in clearer, more focused recordings. Misplaced panels, on the other hand, can do little to improve the sound, wasting your effort and money. The tradeoff is that precise placement requires some trial and error, but the payoff is a much more controlled acoustic environment that captures your voice cleanly.
How to Seal Your Closet Door & Why It Matters
The door is often the weak link in any small space. Gaps around the edges let sound escape and unwanted noise leak in.
Seal cracks with weatherstripping, or hang a thick moving blanket over the door. For a quick fix, tape or foam strips can block leaks. The goal: make the door as airtight as possible without trapping heat.
This simple step can cut noise transmission by 50% or more, making your closet far quieter. It also prevents sound from leaking out, which is crucial if you’re recording in a shared space or want to avoid disturbing others. The tradeoff is that an airtight seal might make the space feel cramped or trap heat, so balancing sealing with ventilation is key. Proper sealing not only reduces noise but also enhances the effectiveness of your acoustic treatments by preventing sound leaks from undermining your efforts.
Treating Corners & Low Frequencies: Why You Need Bass Traps
Small rooms often develop bass buildup and standing waves, making your recordings boomy or muddy. For solutions on treating low frequencies, see bass traps and low-frequency treatment. Bass traps in corners can tame these low frequencies.
In a tiny closet, thick panels or DIY traps filled with mineral wool or rockwool can absorb bass energy. Place them in the corners, especially where walls meet the ceiling and floor.
For example, a 2-foot-wide bass trap in the corner can reduce bass peaks by up to 10 dB, according to acoustic measurements. Without proper bass trapping, your recordings might sound overly boomy or muddy, especially at low frequencies where sound waves tend to accumulate in corners. The tradeoff is that bass traps can be bulky and may require some DIY effort, but they are essential for achieving a balanced, clear sound that accurately captures your voice without low-end muddiness.
Ventilation and Heat: Keeping Your Closet Rig Cool & Quiet
A sealed closet with a hot, high-power rig can heat up dangerously fast. Good ventilation isn’t just for comfort — it’s essential for safety and performance. Learn more about ventilation solutions at home improvement.
Active ventilation with quiet fans or ducted airflow helps dissipate heat. Use thermostats or temperature-controlled exhaust systems to prevent overheating.
Without proper airflow, your rig throttles or heats up, and fans roar louder as they try to cool down. This can introduce unwanted noise into your recordings and potentially damage equipment over time. Learning how to balance ventilation with soundproofing is critical; for example, using duct mufflers or quiet inline fans can help maintain a quiet environment. Proper ventilation ensures your gear performs optimally and stays safe, avoiding overheating and noise issues that compromise your recordings.
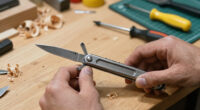
Choosing the Right Mic & Gear for Small Spaces
Not all mics are created equal for tiny rooms. A condenser mic with a tight polar pattern (like hypercardioid) reduces room noise, while dynamic mics are even better for untreated spaces.
For example, a Rode NT1 or Shure SM7B can cut down room reflections and background noise, making your recordings cleaner.
Pair that with a boom arm or shock mount to keep the mic stable and minimize vibrations.
DIY vs. Buying: What’s Worth It for a Closet Studio?
DIY treatments like moving blankets, thick curtains, or homemade panels can do a good job at a fraction of store-bought solutions. Think of it as a kitchen hack — simple materials can turn a closet into a decent booth.
On the other hand, professional bass traps, acoustic panels, and sealed soundproof doors cost more but offer predictable results and less hassle.
Balance your budget with your needs. For most hobbyists, a mix of DIY and strategic investments works best.
Frequently Asked Questions
Can a closet really work as a vocal booth?
Yes, if you treat the space properly — focusing on reflection points, sealing gaps, and adding bass traps. It’s not perfect, but for many voice recordings and streaming, it’s more than enough.What’s the difference between acoustic treatment and soundproofing?
Acoustic treatment reduces echo and reflections inside a space, while soundproofing stops sound from leaking in or out. You often need both, but in a closet, focus on absorption and sealing rather than total isolation.Where should I place foam or panels in a closet?
Start with the wall behind your mic, then cover side reflection points and the ceiling. Don’t forget the door and corners for bass trapping. Proper placement makes a huge difference.Do I need bass traps in a closet booth?
Absolutely. Small spaces tend to trap low frequencies, which can muddy your recordings. Thick bass traps placed in corners are a simple fix.How much of the walls should be covered?
Covering 20-30% of the surface area with absorptive panels at reflection points is a good rule of thumb. Focus on the primary reflection zones for maximum impact.Conclusion
The secret to a successful closet rig isn’t in expensive foam or fancy gear. It’s about smart placement, sealing leaks, and managing heat. With these simple steps, your tiny space can turn into a surprisingly effective recording or streaming booth.
Remember: the goal isn’t total silence but controlling reflections and leaks. Set realistic expectations, stay creative, and you’ll find your perfect balance of sound and space.